|
| Đăng Kí | Hỏi/Đáp | Danh Sách | Lịch | Bài Trong Ngày | Tìm Kiếm |
|
||||||||
|
|
||||||||
|
 Chia Sẽ Kinh Nghiệm Về IT
  |
|
|
Công Cụ | Xếp Bài |
|
|
#1 |
|
Guest
Trả Lời: n/a
|
Tính năng SSD Cache on VMware ESXi Host (How to Create a Virtual SSD for vSphere 5.5
Tính năng SSD Cache on VMware ESXi Host (How to Create a Virtual SSD for vSphere 5.5 vFlash)
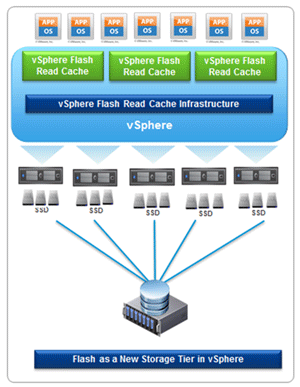
 One of my favorite upgrades in VMware's vSphere 5.5 is Flash Read Cache, or vFlash. It's integrated with vCenter 5.5, high availability (HA), distributed resource scheduler (DRS) and vMotion. vFlash uses a portion of a local physical Solid State Drive (SSD) drive in a vSphere infrastructure to allow for a high-performance read cache layer for the ESXi Host. The other very nice benefit is that vFlash offloads I/O from your SAN to the vFLash local, physical SSD. As a result, the ESXi host provides lower application latency to its hosted virtual machines (VMs) and their applications. I needed to speed up the performance of the applications running on some of my VMs under a proof of concept environment, so I decided to use vFlash. However, I didn't have a physical SSD, so I created a virtual SSD. I did it by tricking vSphere into accepting a virtual SSD in lieu of a physical one.  [Click on image for larger view.] Figure 1. vSphere Flash Read Cache Infrastructure. The process of creating a virtual SSD is straightforward. While it's not a permanent substitute for a physical SSD, it works for testing in an ESXi lab environment. Virtual SSDs save money on hardware, without causing a big impact on performance. Here are the steps for creating the virtual SSD: [Click on image for larger view.] Figure 1. vSphere Flash Read Cache Infrastructure. The process of creating a virtual SSD is straightforward. While it's not a permanent substitute for a physical SSD, it works for testing in an ESXi lab environment. Virtual SSDs save money on hardware, without causing a big impact on performance. Here are the steps for creating the virtual SSD:
~ # esxcli storage nmp satp rule add -s VMW_SATP_LOCAL -d mpx.vmhba1:C0:T0:L0 -o enable_ssd Next, verify the SATP rule creation: ~ # esxcli storage nmp satp rule list | grep enable_ssd Output: VMW_SATP_LOCAL mpx.vmhba1:C0:T0:L0 enable_ssd user Next comes reclamation of the new virtual SSD, to enable application of the SATP rule: ~ # esxcli storage core claiming reclaim -d mpx.vmhba1:C0:T0:L0 Finally, confirm that the new virtual SSD has been created: ~ # esxcli storage core device list -d mpx.vmhba1:C0:T0:L0 Output: mpx.vmhba1:C0:T2:L0 Display Name: Original VM Disk (mpx.vmhba1:C0:T0:L0) Has Settable Display Name: false Size: 5120 Device Type: Direct-Access Multipath Plugin: NMP Devfs Path: /vmfs/devices/disks/mpx.vmhba1:C0:T0:L0 Vendor: VMware Model: Virtual disk Revision: 1.0 SCSI Level: 2 Is Pseudo: false Status: on Is RDM Capable: false Is Local: true Is Removable: false Is SSD: true Is Offline: false Is Perennially Reserved: false Thin Provisioning Status: unknown Attached Filters: VAAI Status: unsupported Other UIDs: vml.0000000000577d274761343a323a47 Once you verify that the Is SSD entry is true, the local disk is now a virtual one. You can use the GUI or the following command to refresh vSphere's storage: ~ #vim-cmd hostsvc/storage/refresh Now that your virtual SSD is created and verified, you can add it to your ESXi host(s) and start using the vFlash feature. vFlash is easy to set up – just configure it in the vCenter Web client. Setting Up vFlash: 1. In the vSphere Web Client, navigate to the host. 2. Click the Manage tab and click Settings. 3. Under Virtual Flash, select Virtual Flash Resource Management, then click Add Capacity. 4. From the list of available SSD devices, select the newly-created local virtual SSD drive to use for virtual flash and click OK. A Few Warnings Now that you have vFlash configured and operational, you can now start enjoying its benefits. Remember to ensure that you have VM version 10, or your VMs ill not benefit from the vFlash benefits. I also recommend that you have the vFlash configured for each ESXi Host. I learned this lesson through initial trial and error while conducting a vMotion session. The VM will fail during a vMotion session if each ESXi Host doesn't have vFlash configured. At this point, your vFlash will start providing the increased storage read and write speeds and reduced storage I/O contention. The best part is that you're utilizing a virtual SSD in lieu of a physical SSD, while maintaining the vFlash benefits, saving on hardware and operating your lab environment within a budget. About the Author James Brown, vExpert, VCP, MCSE, is a senior virtualization engineer and CEO of Virtuxperts and VMware Users Group Leader in Las Vegas, NV. James' area of expertise includes virtualization, infrastructure and Windows systems. Tham khảo: https://virtualizationreview.com/art...or-vflash.aspx http://www.techrepublic.com/blog/dat...ching-on-esxi/ |

|
 |
|
|